Toddler Matching Game- Shapes & Numbers

Now that we’re quarantined and can’t leave the house, we’ve been looking for activities to keep Hailey busy. She’s been getting a LOT of screen time, so I wanted to make something for her that was fun, easy and educational. Also, bonus points for something that didn’t contain 3,000 pieces for her to throw on the floor and for me to pick up! That’s when I came up with the idea for this felt educational mat- a toddler matching game, if you will. I knew we could teach Hailey her numbers and shapes, but she could also play with it on her own while we cooked or just relaxed. It was perfect timing when Cricut sent me their new Cricut Joy machine, which I’ve been eyeing since they released it! Whether you’ve got a small hobby room or even just a craft cart in the corner, this machine is perfect for you! And, there are SO many projects that you can make with it. If you’ve been on the fence about getting the Cricut Joy, here is the universe telling you- it’s time. Get it now, and see how many amazing things you can make! You won’t regret it.

*This post contains affiliate links.

Cricut-Shape-Mat-15.jpg

You will need:

Free Template (here)
Cricut Joy (here or get the bundle here)
Cricut EasyPress 2 (here)
Cricut Smart Iron-On Vinyl (here, I used white)
Cricut Joy StandardGrip Mat (here)
Cricut Starter Tool Set (here)
Cricut EasyPress Mat 12 x 12 (here)
Felt pieces for the shapes (similar here)
Thick Felt (Stiff or Double Thick)
Felt glue (here)
Velcro (here)
Glitter paper (similar here)
Ruler or T-Square (similar here)
Tailor’s chalk (similar here)

Directions:

This project has a lot of small steps, but is simple to make. So, I split each part up into smaller pieces so that it’s less overwhelming of a blog post.

Prep Collage.jpg

Prepping To Make Your Toddler Matching Game:

  1. Open the template on Cricut Design Space. The template is free to use and can be found here.

  2. Cut your paper template using cardstock. I took one page and cut it in half, and ran each one through the Cricut Joy on the StandardGrip Mat. This paper template is for the felt matching shapes.

  3. Load your vinyl into the Cricut Joy. I used Cricut Smart Iron-On Vinyl (here, I used white), which means I didn’t need a cutting mat.

  4. A couple of notes when cutting vinyl: When using an Iron On, always go shiny side down. And, remember that you want to cut the numbers backwards so that they are mirrored. I’ve already done this on the template, so you don’t need to worry about it!

  5. Weed your vinyl using your weeding tool, then carefully cut out the shapes individually. You’ll want to leave the protective (shiny) layer on so that you can iron it.

Cricut-Shape-Mat-6.jpg

To Make The Toddler Matching Game Mat:

  1. Arrange the vinyl shapes on your felt. Try to keep them centered on the mat and lined up.

  2. Once you’ve arranged your shapes, use a ruler to make sure they’re straight. I did this by placing a T-square under the first shape and then lining up the rest of them along the ruler’s edge.

  3. Set up your Cricut EasyPress 2 to the appropriate settings. You can use their handy Heat Guide but for this project, you’ll use 280 degrees for 30 seconds with light pressure.

  4. Put your felt on the Cricut EasyPress Mat, and use your Cricut EasyPress 2 to iron on the vinyl.

  5. Once your vinyl has cooled, carefully peel off the protective (shiny) layer.

Shapes_Collage2.jpg

To Make The Shapes For Your Toddler Matching Game:

  1. Pick out your felt colors. I used 4 colors and figured out which shape should get which color by using pom poms. This ensured that each color wasn’t too close together. 

  2. Take your cardstock shape templates that you had cut out and arrange them on the corresponding felt colors. Make sure that you have plenty of space around each shape so that you can cut it out afterwards.

  3. Slip your vinyl numbers under the template and ensure (once again!) that you have enough room for each shape.

  4. Use your Cricut EasyPress 2 again to iron your numbers. Note: You can also use the EasyPress Mini for this! Especially if you’re using scrap pieces of felt, where the larger EasyPress would just be too big. Let cool and carefully peel. You’ll now be left with a sheet of felt with a few numbers on it.

  5. Place your shape templates back on the vinyl to ensure that your number is centered in the shape. Trace around your shapes with chalk. Then, cut them out.

Envelope_Collage2.jpg

To Make The Envelope For Your Toddler Matching Game:

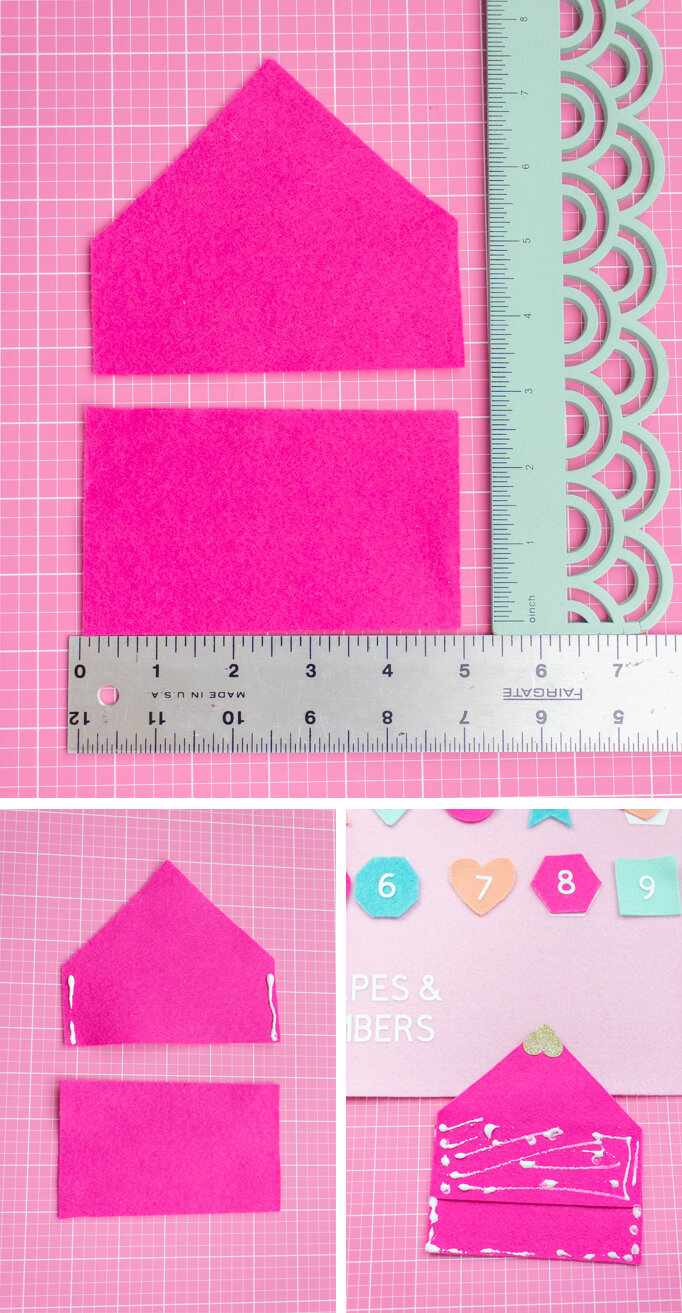
  1. Cut out your envelope pieces from felt. I used a rectangle that was 5 x 2.5 (aka, smaller rectangle) and then a second piece that was approx 5 x 7.5 (aka, the house side).

  2. Take your larger 5 x 7.5 felt rectangle. Fold the two top corners into the center to meet at a point and then cut at the folds. This will create your point at the top while still keeping it nicely centered. Hence, the nickname “the house side”!

  3. Take your “house side” of felt and put felt glue along the two side edges. Then, place your 5 x 2.5 smaller rectangle on top. See the pics for reference on how to make the envelope since it’s a bit funky!

  4. Turn your envelope over and put glue on your envelope as shown in the picture. Then, press it down on your felt mat and wait for it to dry.

  5. For the heart, I used my heart punch but you could just as easily cut one using the Cricut Joy with the Light Grip Mat.

  6. Glue your heart onto the tip of your envelope point. Then, add a piece of velcro to seal it.

Cricut-Shape-Mat-16.jpg

I’m happy to say that Hailey LOVED playing with this matching game! She hasn’t quite gotten the hang of matching the shapes and numbers, but she loves to play with the felt shapes and put them on top of the vinyl on the mat. She’s gone back to it every day, and has even put down her iPad to fiddle with this! It makes a momma so happy. 

Cricut-Shape-Mat-18.jpg
Cricut-Shape-Mat-19.jpg
Cricut-Shape-Mat-20.jpg

Although this project has a few steps, it’s really fun to make and quite simple. It keeps Hailey busy and it’s pretty to look at! And, it all tucks away nicely into the envelope to make clean-up a breeze. I leave this out on the coffee table to she can have easy access when she gets bored. I can’t wait to make more projects like this using my Cricut Joy!

Starting today through 4/25, Cricut is launching their Spring Cleaning Flash Sale, featuring 40% off select materials and accessories, and Explore Air 2 Machines at their lowest price ever of $179.99! In addition, snag a Maker Machine for $329 or a BrightPad for $49!

Explore Air 2 Machines at Their Lowest Price Ever - As Low as $179.99! Valid through 4/25 

Maker Machines Starting at $329! Valid through 4/25  

Save 40% off Select Materials! Valid through 4/25 

Save up to 75% off Materials & Accessories Clearance! Valid through 4/25


Cricut.com is offering Free Economy Shipping on orders $99+ with code SHIPAPR or APRSHIP, and Cricut Access Members receive free shipping on orders through 4/30. Head over to their website and load up your cart girlfriend- let’s get crafting!

DIY Mean Girls Tote Bag

It’s Mean Girls Day! In case you’re wondering why today of all days is Mean Girls day, it’s because of this scene. As a total Mean Girls fan myself, I couldn’t let this day pass by without doing a fun DIY project! It’s so fetch. Before we begin, I want to encourage you to see what I did last year, because even with a 5 day old baby, I had to celebrate! How cute was teeny tiny nose-picking Hailey?! I can’t handle it.

I created not one, but FOUR different Mean Girls quotes that you can put on a bag! This project is perfect because you can carry these bags all year long to show off your love for Mean Girls. You can do pretty much any quote you want to, but I picked four of the more iconic ones. And I made a template so it’s super easy for you to do it, too!

*This post contains affiliate links.

It’s Mean Girls Day! As a total Mean Girls fan myself, I couldn’t let this day pass by without doing a fun DIY project! It’s so fetch. I love a good tote bag, so I had to make my own and of course, it’s pink! Click for the tutorial and the FREE Cric…

You will need:

Pink tote bags (here)
White iron on vinyl (here)
Cricut (here)
Standard grip mat (here)
Cricut tools (here)
Iron (similar here)
Cut template ( this link or this link)

Directions:

It’s Mean Girls Day! As a total Mean Girls fan myself, I couldn’t let this day pass by without doing a fun DIY project! It’s so fetch. I love a good tote bag, so I had to make my own and of course, it’s pink! Click for the tutorial and the FREE Cric…
  1. You have two options for the template, for a total of 4 quotes. To see them, go to this link or this link for your cut files.

  2. Load your vinyl and cut the quote(s) for your tote. For a more in-depth post on how to cut iron-on vinyl, go to this post for the full directions. Don’t forget to mirror them!

  3. Weed your vinyl to remove the excess. Do this carefully so you don’t end up ruining any of your letters.

  4. Center the decal, then iron it onto your bag. Make sure you wait for it to cool completely before trying to peel it!

It’s Mean Girls Day! As a total Mean Girls fan myself, I couldn’t let this day pass by without doing a fun DIY project! It’s so fetch. I love a good tote bag, so I had to make my own and of course, it’s pink! Click for the tutorial and the FREE Cric…

Now, go shop til you drop with your new totes! Or, give them as a gift to a fellow Mean Girls lover with a bottle of Rosé inside and a pack of popcorn. Pop in a copy of the DVD if you don’t think they have it! Also, be sure to go watch Mean Girls on this most joyous of holidays. It’s the grool thing to do.

Must Have Craft Supplies

For those of you who are unaware, I'm in the process of cleaning & organizing my craft room. Let's just say, it's been an adventure. Although I have a whoooole lotta stuff, some people may want to know, what do you need to get started? After all, not everyone ends up with a whole room full of craft supplies overnight, right? To help all you aspiring crafters, I've created this list of my must-have craft supplies, along with a FREE printable you can download and take with you to the craft store! This way, you can start your post-apocolyptic craft bunker too ;)

Creating your Crafting Arsenal

Ok, way back in March of 2017, I told you how to be efficient to get all our crafts projects done in time. Now, let's talk about the supplies we need to do them! Here are some of my favorite, must-have items in your craft stash.

Starting a craft stash? Click to find out my must-have items for crafters of any skill level, plus some tips to save money and to rock a DIY party!

1. Glue Gun 2. Jewelry Tools 3. Cricut Explore Air 4. Paper Cutter 5. Circle, Heart, Star Paper Punches 6. E6000 Glue and Photosafe Glue Stick 7. Glue Gun Caddy 8. Mini Iron 9. Small Scissors and Large Scissors 10. Washi Tape 11. Paper Roll 12. Self-Healing Cutting Mat 13. Fringe Scissors 14. Craft Caddy 15. Paintbrushes and Paint Tray

1. Glue Gun- this one needs no explanation, but I'll give you one. Glue guns are handy for almost everything! They're good for craft projects, sure, but you can also use them for temporary fixes, party decor, etc. I've used it on nearly every project I've done, including my Pineapple Garland, Snowcone Party Hats, and Cotton Candy Garland. I guarantee if you buy one, you'll find a reason to use it. So, go get one!

2. Jewelry Tools- I purchased these for making jewelry once upon a time, but they're just handy to have around. I've used them for several crafts projects already on the blog, like my KS Inspired Bracelets and Wood Bead Tassel Necklace, but they're also good for cutting fake flowers and even for fixing your own jewelry when it breaks! Unlike regular tools, these are smaller, so they're better for tiny objects and precise fixes.

3. Cricut Explore Air- I resisted buying a Cricut for a while, but it's so handy to have! I used it for the Rapunzel lanterns at my Disney Themed Engagement Party, for my sister's Halloween costume, and for my Mean Girls Conversation Hearts. I'll probably be using it for my wedding too! It cuts a whole bunch of materials as well, not just paper and vinyl! It's an investment for sure, but I think it's really fun to have.

4. Paper Cutter- This little gadget is perfect for cutting a straight line. It's great for making banners and cutting out Printables from the internet. I've used it for my TGIF 90's Themed Slumber Party and my Nautical Notecard Birthday Banner. It's easy to use and small to store. Remember those giant paper cutters we had in school that looked like a guillotine? This is a much smaller, safer version of that. 

5. Paper Punches (Circle, Heart, Star)-  These punches are great to have on hand if you need to spruce up a project. So far I've used them on my Nautical Notecard Birthday Banner and Rock Candy Christmas Trees. They're easy to use and small, so they're easy to store!

6. E6000 Glue and Photosafe Glue Stick - E6000 is my second favorite glue, after glue guns. It adheres to nearly everything! It's a little smelly, so you need to use it with a window open, but it's great. I've used it for my DIY Dollar Store Candy Jars, my Zebra Party Tray and my Circus Animal Drink Stirrers. The photo safe glue stick is great for scrapbooking projects, making cards, and making collages! I used them for my DIY 90' Pun Valentines.

7. Glue Gun Caddy- I actually found this product while creating this blog post, and HAD to buy it. It holds your (hot!) glue gun, glue sticks, and protects your table. It's amazing! Never again will you be holding your half glued project mid-air while trying to remember where you left your glue sticks!

8. Mini Iron- A mini iron is great for small craft or sewing projects. I used it for my Mean Girls Conversation Hearts, the eye masks in my TGIF 90's Themed Slumber Party, and for touching up a wrinkly tablecloth on my Glam Friendsgiving Dinner. It's perfect for iron-ons!

9. Small Scissors and Large Scissors- I love that these scissors are so dang cute. Can we start with that?! I don't need to tell you why scissors are handy, so I'll just say that these small ones are great for when you need to do something precise, like making tassels, since they have pointed blades. These larger ones are great for cutting pieces of paper, cardboard, or other large things that require a straight line. I've used them in nearly every blog post, but they were especially useful for my Cotton Candy Garland and Rock Candy Christmas Trees.

10. Washi Tape- Washi tape has so many fun uses! It's great for temporarily sticking things together, for spicing up a project, or even organizing your planner! I used it to paint my beads for my Wood Bead Tassel Necklace, and it was super handy.

11. Paper Roll- This paper roll is great to avoid making a mess. You just need to pull a sheet long enough to cover your workspace to keep it clean. Ever dripped paint on your desk, or written with a marker that bleeds? This will help prevent them from staining! Sure, you can use newspapers but that means that 1. if you take photos of your project it won't look clean and neat, and 2. you'll have to find the newspapers. I highly recommend having this on hand!

12. Self-Healing Cutting Mat- This is one of my newest purchases. I haven't really used it yet (except as a really pretty backdrop for some craft projects) but it's got a ruler, which is great for measuring projects while working on them. It's also really thick and reversible, so you get twice the use and durability! Plus, the pink is SO much fun.

13. Fringe Scissors- Back when I made my Mini Faux Pintatas, I didn't have a pair of these scissors and I regretted it. They're so handy for making pinatas, fringe, and shredding up paper. It has 5 blades, so it makes more cuts and gets your project done faster! Again, VERY good for when you're making multiple projects at once!

14. Craft Caddy- A craft caddy is great for holding all your supplies and keeping them organized. I highly recommend having a spot that you use to store everything so that you can find it when you need it. There have been so many times that I lost my glue sticks, my paintbrushes, or my paper punches when I needed them. These crafting supplies are only useful when you can actually find and use them (duh). So, be sure to find a place where they can all stay together, like one big happy crafting family.

15. Paintbrushes and Paint Tray- These paintbrushes have a variety of uses! It's great to have multiple sizes so that you can do broad strokes quickly, but also have a nice thin one when you need to be more detailed. I really should invest in a new paint palette because mine is old and full of dried paint ("invest" = probably $3!) but paint palettes are really useful for pouring out just a little bit of paint or mixing colors. I've used paintbrushes on so many projects, including my DIY Donut Party Platter, my Colorful Leaf Garland, and my Circus Animal Drink Stirrers.

How to avoid going broke on craft supplies

I know what you're thinking- craft supplies can be expensive! I recommend adding a few items at a time, or using coupons! Michael's has plenty of sales and coupons you can use. There's also stores like A.C. Moore, Jo-Ann Fabric & Crafts, and Hobby Lobby. If you want to save even more, your local dollar store and even Walmart has a huge craft selection for cheap! Target also has some craft supplies, but not as many as Walmart. However, Target has some really CUTE stuff! Start small and keep adding more over time. Your crafting empire wasn't built in a day, right?

Do you already have a craft stash? What's in it? What can you NOT live without? I think for me, it's my glue gun. I even have one at work! Let me know your faves in the comments below.

DIY Pennant Flag Puns

Everyone is super excited about the Super Bowl, and I’m like cool... an excuse to have a party and eat! I’ve never really been into sports (or good at them...) so I figured for Super Bowl, I’ll just do what I do best... crafting! Since I don’t even know who’s playing, I figured I’d keep it nice and generic with some colorful, silly pennant flags that you can use for pretty much any football game in the future. And since I’m ridiculous, they’re full of funny sayings. That’s right- you can make some PUN-nant flags for your home! (see what I did there?!)

Pennant Flag Puns 18.jpg

You will need:

Pennant Flag Puns 5.jpg

Felt (similar here)
Cricut (here)
White iron-on vinyl (here)
Printer (I have this one and love it!)
Pennant template (here)
Cricut Template (here)
Iron (here)
Felt Scraps
Brown acrylic paint (here)
Glue gun
Cricut supplies & fabric scissors (here and here)
Felt football stickers (similar here)

Directions

Pennant Flag Puns Collage.jpg
  1. Cut out your vinyl on the cricut and get it ready for ironing. To learn more about using Cricut iron-on vinyl (with full instructions!) check out this post.
  2. Using your template, cut your pennant flags out of felt. If you position them efficiently, you can get at least 2 flags out of 1 piece of felt. 
  3. Iron your quotes onto the pennant flags. Let cool fully before peeling. See this post for more info.
  4. Create your felt embellishments as per the instructions below.
  5. Glue your embellishments onto the pennant flag using a glue gun.

For the finger:

Pennant Flag Puns 13.jpg

Cut a hand and finger shape out of pink felt. If you’re not sure of the shape, use a photo from online and trace it as a template onto the felt. Add a perimeter with white paint, then paint little triangles below the perimeter for knuckles. Once your paint has dried, iron the #1 onto the foam finger, then glue onto your flag. 

For the cookie:

Pennant Flag Puns cookies.jpg

Cut a squiggly oval out of tan felt. Using brown paint, add small dots for chocolate chips. My paint was named Melted Chocolate- how perfect! Let dry, then glue onto the flag. 

For the beer cup:

Pennant Flag Puns beer.jpg

Cut the shapes out of felt- a cup with handle, an oval with a flat top for the beer, a smaller oval with a flat top for the accent color, and white foam. I also cut an additional cup handle for more depth, which was basically a C-shape. Fold the cup in half, then cut the middle out of the handle. Trim as needed. Glue the felt pieces together and then glue your cup onto your flag. 

Pennant Flag Puns 14.jpg
Pennant Flag Puns 17.jpg
Pennant Flag Puns 16.jpg
Pennant Flag Puns 15.jpg

So what do you do with these now? Add a ribbon and hang them up! Or, add a stick and let your pun-nant flag fly! Or, uh... wave? What great football puns did I miss? Let me know in the comments below!

DIY Mean Girls Conversation Hearts Banner (and how to use Cricut Iron On Vinyl!)

There are some movies that you watch once and enjoy, but never really have the desire to see again. Then, there are those movies that you watch over and over again until you've memorized practically every word. Mean Girls is one of those movies. If you can't recite at least one of those memorable quotes, then you can't sit with us! It's got Lindsay Lohan at the peak of her career, Tina Fey's comedy, Rachel McAdams & Amanda Seyfriend before they were super famous, and Lacey Chabert from everyone's favorite show, Party of Five (people liked that show, right? I never watched it...). Combine that with the awesome 2004 fashion sense, the catchy lines, the harsh reality of frenemies, and the fact that you always wanted to be popular, and you've pretty much got the makings of a FANTASTIC movie. It was basically made by girls, for girls, so there's no way it wouldn't succeed. PS, can we talk about how everyone in Mean Girls wore lip gloss?! I'm not sure about you guys, but I don't wear lip gloss anymore. Is that just a high school thing? Idk...

Give your sweetheart candies a little bit of attitude this year by making them into Mean Girls Conversation Hearts. So Fetch! Click for the full tutorial, along with how to use Cricut iron on vinyl.

With Valentine's Day coming up, I wanted to make something fun with some felt hearts I picked up at Target. They look to me like Conversation Hearts candy, which are usually boringly sweet. "U R CUTE"? "CALL ME"? C'mon.... But, what if they were sorta sassy instead? PERFECT OPPORTUNITY for a Mean Girls DIY. Just sayin'.

Go grab some popcorn, your Mean Girls DVD, and your glue gun. This is going to be Grool!

You will need:

Cricut iron-on vinyl is actually pretty simple to use, as long as you know which way the vinyl goes and how to make sure your letters aren't backwards. Click for the full tutorial, along with how to make some Mean Girls conversation hearts!

Cricut Explore Air Machine (here)
Pastel felt hearts (from Target)
Iron (here)
Red iron-on transfer (here)
Cricut tool kit or Tweezers (here)
Ribbon
Glue gun

I know what you're thinking..."How do I use Cricut iron on vinyl?" I knew you'd ask, so I have just the tutorial for you. How did I know? I have a fifth sense... It's like I have ESPN or something. The iron on vinyl is actually pretty simple to use, as long as you know which way the vinyl goes and how to make sure your letters aren't backwards.

How to Use Cricut Iron-On Vinyl

1. Open the Mean Girls Conversation Hearts Candy document in Cricut Design Space. 

Cricut iron-on vinyl is actually pretty simple to use, as long as you know which way the vinyl goes and how to make sure your letters aren't backwards. Click for the full tutorial, along with how to make some Mean Girls conversation hearts!

2. Take your red iron-on vinyl and place it on your cutting sheet, liner side down. You'll be cutting the vinyl (matte side), so that means the shiny side goes down.

Cricut iron-on vinyl is actually pretty simple to use, as long as you know which way the vinyl goes and how to make sure your letters aren't backwards. Click for the full tutorial, along with how to make some Mean Girls conversation hearts!

3. Set up the file to cut on your Cricut machine by following the steps below. 

a. Set your Cricut machine mode to vinyl +

Cricut iron-on vinyl is actually pretty simple to use, as long as you know which way the vinyl goes and how to make sure your letters aren't backwards. Click for the full tutorial, along with how to make some Mean Girls conversation hearts!

b. Press Go

Cricut iron-on vinyl is actually pretty simple to use, as long as you know which way the vinyl goes and how to make sure your letters aren't backwards. Click for the full tutorial, along with how to make some Mean Girls conversation hearts!

c. Set to mirror image! This is very important, since your text needs to be backwards so that it'll be the right way when you finish.

Cricut iron-on vinyl is actually pretty simple to use, as long as you know which way the vinyl goes and how to make sure your letters aren't backwards. Click for the full tutorial, along with how to make some Mean Girls conversation hearts!

c. Load your Cricut cutting mat and start cutting.

Cricut iron-on vinyl is actually pretty simple to use, as long as you know which way the vinyl goes and how to make sure your letters aren't backwards. Click for the full tutorial, along with how to make some Mean Girls conversation hearts!

d. Wait for the Cricut machine to cut your file. Mine wouldn't cut the full document in one shot (annoying!) so after it stopped each time, I would remove the ones it cut from the document/cutting mat, reload the mat, and start cutting again.

Cricut iron-on vinyl is actually pretty simple to use, as long as you know which way the vinyl goes and how to make sure your letters aren't backwards. Click for the full tutorial, along with how to make some Mean Girls conversation hearts!

Look at all those fabulous quotes just waiting to get out there into the world!

Cricut iron-on vinyl is actually pretty simple to use, as long as you know which way the vinyl goes and how to make sure your letters aren't backwards. Click for the full tutorial, along with how to make some Mean Girls conversation hearts!

4. Once your document has finished cutting on the Cricut machine, carefully cut around each quote. It's best to cut as close as you can to the letters, and try to make the border around each side even. This will make it easier to center them on the conversation hearts.

Cricut iron-on vinyl is actually pretty simple to use, as long as you know which way the vinyl goes and how to make sure your letters aren't backwards. Click for the full tutorial, along with how to make some Mean Girls conversation hearts!

5. Peel off the remaining vinyl, aka the extra red background. You'll be left with the clear liner and your letters. To do this, I take my Cricut hook tool and scrape a corner to make a hole.

Cricut iron-on vinyl is actually pretty simple to use, as long as you know which way the vinyl goes and how to make sure your letters aren't backwards. Click for the full tutorial, along with how to make some Mean Girls conversation hearts!

Then, I carefully and slowly peel away the liner to reveal the letters beneath. I found that peeling the vinyl from left to right was easier, since most of the letters face that way. Otherwise, you're going against the grain. So, aka... not the way I'm doing it in the photos.

Cricut iron-on vinyl is actually pretty simple to use, as long as you know which way the vinyl goes and how to make sure your letters aren't backwards. Click for the full tutorial, along with how to make some Mean Girls conversation hearts!

See how the E and the D in "Wednesday" are connected? That's because I'm peeling it the "wrong" way and it ripped the vinyl. It's not a big deal at all, because that's a scrap section anyway, but it makes it easier to peel if you go with the grain.

Cricut iron-on vinyl is actually pretty simple to use, as long as you know which way the vinyl goes and how to make sure your letters aren't backwards. Click for the full tutorial, along with how to make some Mean Girls conversation hearts!

6. Once you've pulled away the excess Cricut vinyl, go back and remove the excess vinyl in the letter holes, or any that was left over. Flip it over and double check that everything is where it should be.

Cricut iron-on vinyl is actually pretty simple to use, as long as you know which way the vinyl goes and how to make sure your letters aren't backwards. Click for the full tutorial, along with how to make some Mean Girls conversation hearts!

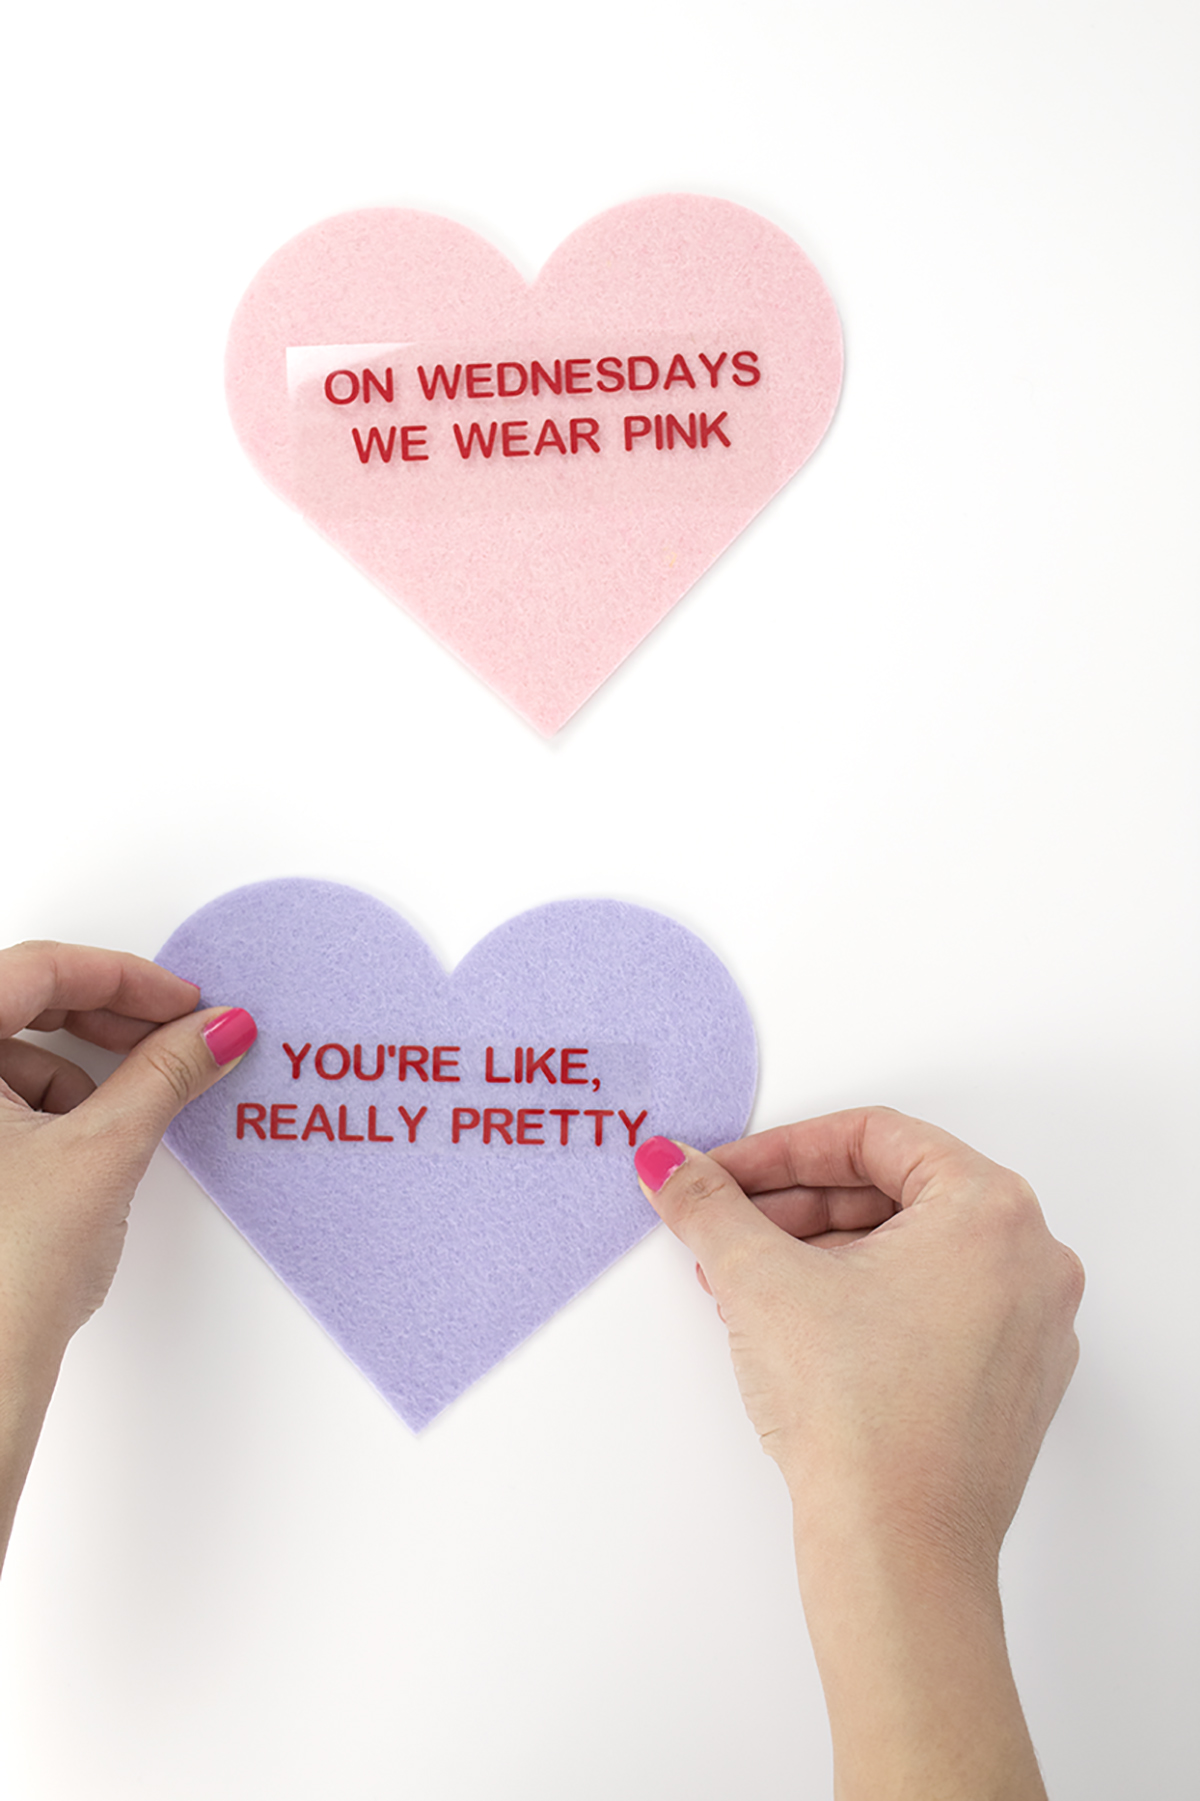
7. Center your quote on your conversation heart and press it down. To make sure it's evenly centered, I would look at a few things, like which word is in the center of the heart, how much distance is on either side, and how far it is from the top. If you're still not sure, take a quick picture with your phone to see if it's off center or crooked.

Give your sweetheart candies a little bit of attitude this year by making them into Mean Girls Conversation Hearts. So Fetch! Click for the full tutorial, along with how to use Cricut iron on vinyl.

8. Use your iron to carefully iron your quote onto the heart. Use the wool/low setting and place a cloth over it so you don't scorch the felt. Then, flip your heart over and iron the underside. If you have a small craft iron, you may be able to do it without a cloth like I did.

Give your sweetheart candies a little bit of attitude this year by making them into Mean Girls Conversation Hearts. So Fetch! Click for the full tutorial, along with how to use Cricut iron on vinyl.

9. Let it cool, then peel the liner off from the corner. Do this carefully to make sure all the letters fully adhered. If not, go back over it again, let it cool, and continue peeling.

Give your sweetheart candies a little bit of attitude this year by making them into Mean Girls Conversation Hearts. So Fetch! Click for the full tutorial, along with how to use Cricut iron on vinyl.

Once all your quotes are ironed on, you can begin arranging your banner! See how I did that below.

Give your sweetheart candies a little bit of attitude this year by making them into Mean Girls Conversation Hearts. So Fetch! Click for the full tutorial, along with how to use Cricut iron on vinyl.
Cricut iron-on vinyl is actually pretty simple to use, as long as you know which way the vinyl goes and how to make sure your letters aren't backwards. Click for the full tutorial, along with how to make some Mean Girls conversation hearts!

Making your banner

1. Arrange your hearts in the order you'd like to see them, or by color.

Give your sweetheart candies a little bit of attitude this year by making them into Mean Girls Conversation Hearts. So Fetch! Click for the full tutorial, along with how to use Cricut iron on vinyl.

2. Cut a small piece of ribbon. This will act as a "tape" to hold the hearts together.

Give your sweetheart candies a little bit of attitude this year by making them into Mean Girls Conversation Hearts. So Fetch! Click for the full tutorial, along with how to use Cricut iron on vinyl.

3. Glue the ribbon onto the hearts at the widest part. Be sure to hold them as close together as you can to prevent a gap from forming between the hearts. I used pink ribbon, but a white one will probably camouflage the best. You can't really see it when you flip the banner over, so technically it doesn't matter.

Give your sweetheart candies a little bit of attitude this year by making them into Mean Girls Conversation Hearts. So Fetch! Click for the full tutorial, along with how to use Cricut iron on vinyl.

I also recommend adding some extra ribbon or twine at the ends to hang it. I originally didn't want to do that, but taping felt on a wall is basically impossible.

Give your sweetheart candies a little bit of attitude this year by making them into Mean Girls Conversation Hearts. So Fetch! Click for the full tutorial, along with how to use Cricut iron on vinyl.

Woohoo! Now, hang up your banner and revel in the joy of a Mean Girls Valentine's Day. You can also paste up some hearts as a party backdrop! This is my best Mean Girls face. Slightly friendly, slightly fierce, 100% Fetch. 

Give your sweetheart candies a little bit of attitude this year by making them into Mean Girls Conversation Hearts. So Fetch! Click for the full tutorial, along with how to use Cricut iron on vinyl.

P.S. "And none for Gretchen Weiners. Bye!" is basically my favorite Mean Girls quote, and I use it in everyday life. It has so many practical uses.

Give your sweetheart candies a little bit of attitude this year by making them into Mean Girls Conversation Hearts. So Fetch! Click for the full tutorial, along with how to use Cricut iron on vinyl.

So you agree? You think you're really pretty?

Give your sweetheart candies a little bit of attitude this year by making them into Mean Girls Conversation Hearts. So Fetch! Click for the full tutorial, along with how to use Cricut iron on vinyl.

I really need to start wearing pink on Wednesdays. I mean, that's just like, the rules of feminism

Give your sweetheart candies a little bit of attitude this year by making them into Mean Girls Conversation Hearts. So Fetch! Click for the full tutorial, along with how to use Cricut iron on vinyl.

So what's your favorite Mean Girls quote? Is it one I missed? Let me know in the comments below!