Toddler Matching Game- Shapes & Numbers

Now that we’re quarantined and can’t leave the house, we’ve been looking for activities to keep Hailey busy. She’s been getting a LOT of screen time, so I wanted to make something for her that was fun, easy and educational. Also, bonus points for something that didn’t contain 3,000 pieces for her to throw on the floor and for me to pick up! That’s when I came up with the idea for this felt educational mat- a toddler matching game, if you will. I knew we could teach Hailey her numbers and shapes, but she could also play with it on her own while we cooked or just relaxed. It was perfect timing when Cricut sent me their new Cricut Joy machine, which I’ve been eyeing since they released it! Whether you’ve got a small hobby room or even just a craft cart in the corner, this machine is perfect for you! And, there are SO many projects that you can make with it. If you’ve been on the fence about getting the Cricut Joy, here is the universe telling you- it’s time. Get it now, and see how many amazing things you can make! You won’t regret it.

*This post contains affiliate links.

Cricut-Shape-Mat-15.jpg

You will need:

Free Template (here)
Cricut Joy (here or get the bundle here)
Cricut EasyPress 2 (here)
Cricut Smart Iron-On Vinyl (here, I used white)
Cricut Joy StandardGrip Mat (here)
Cricut Starter Tool Set (here)
Cricut EasyPress Mat 12 x 12 (here)
Felt pieces for the shapes (similar here)
Thick Felt (Stiff or Double Thick)
Felt glue (here)
Velcro (here)
Glitter paper (similar here)
Ruler or T-Square (similar here)
Tailor’s chalk (similar here)

Directions:

This project has a lot of small steps, but is simple to make. So, I split each part up into smaller pieces so that it’s less overwhelming of a blog post.

Prep Collage.jpg

Prepping To Make Your Toddler Matching Game:

  1. Open the template on Cricut Design Space. The template is free to use and can be found here.

  2. Cut your paper template using cardstock. I took one page and cut it in half, and ran each one through the Cricut Joy on the StandardGrip Mat. This paper template is for the felt matching shapes.

  3. Load your vinyl into the Cricut Joy. I used Cricut Smart Iron-On Vinyl (here, I used white), which means I didn’t need a cutting mat.

  4. A couple of notes when cutting vinyl: When using an Iron On, always go shiny side down. And, remember that you want to cut the numbers backwards so that they are mirrored. I’ve already done this on the template, so you don’t need to worry about it!

  5. Weed your vinyl using your weeding tool, then carefully cut out the shapes individually. You’ll want to leave the protective (shiny) layer on so that you can iron it.

Cricut-Shape-Mat-6.jpg

To Make The Toddler Matching Game Mat:

  1. Arrange the vinyl shapes on your felt. Try to keep them centered on the mat and lined up.

  2. Once you’ve arranged your shapes, use a ruler to make sure they’re straight. I did this by placing a T-square under the first shape and then lining up the rest of them along the ruler’s edge.

  3. Set up your Cricut EasyPress 2 to the appropriate settings. You can use their handy Heat Guide but for this project, you’ll use 280 degrees for 30 seconds with light pressure.

  4. Put your felt on the Cricut EasyPress Mat, and use your Cricut EasyPress 2 to iron on the vinyl.

  5. Once your vinyl has cooled, carefully peel off the protective (shiny) layer.

Shapes_Collage2.jpg

To Make The Shapes For Your Toddler Matching Game:

  1. Pick out your felt colors. I used 4 colors and figured out which shape should get which color by using pom poms. This ensured that each color wasn’t too close together. 

  2. Take your cardstock shape templates that you had cut out and arrange them on the corresponding felt colors. Make sure that you have plenty of space around each shape so that you can cut it out afterwards.

  3. Slip your vinyl numbers under the template and ensure (once again!) that you have enough room for each shape.

  4. Use your Cricut EasyPress 2 again to iron your numbers. Note: You can also use the EasyPress Mini for this! Especially if you’re using scrap pieces of felt, where the larger EasyPress would just be too big. Let cool and carefully peel. You’ll now be left with a sheet of felt with a few numbers on it.

  5. Place your shape templates back on the vinyl to ensure that your number is centered in the shape. Trace around your shapes with chalk. Then, cut them out.

Envelope_Collage2.jpg

To Make The Envelope For Your Toddler Matching Game:

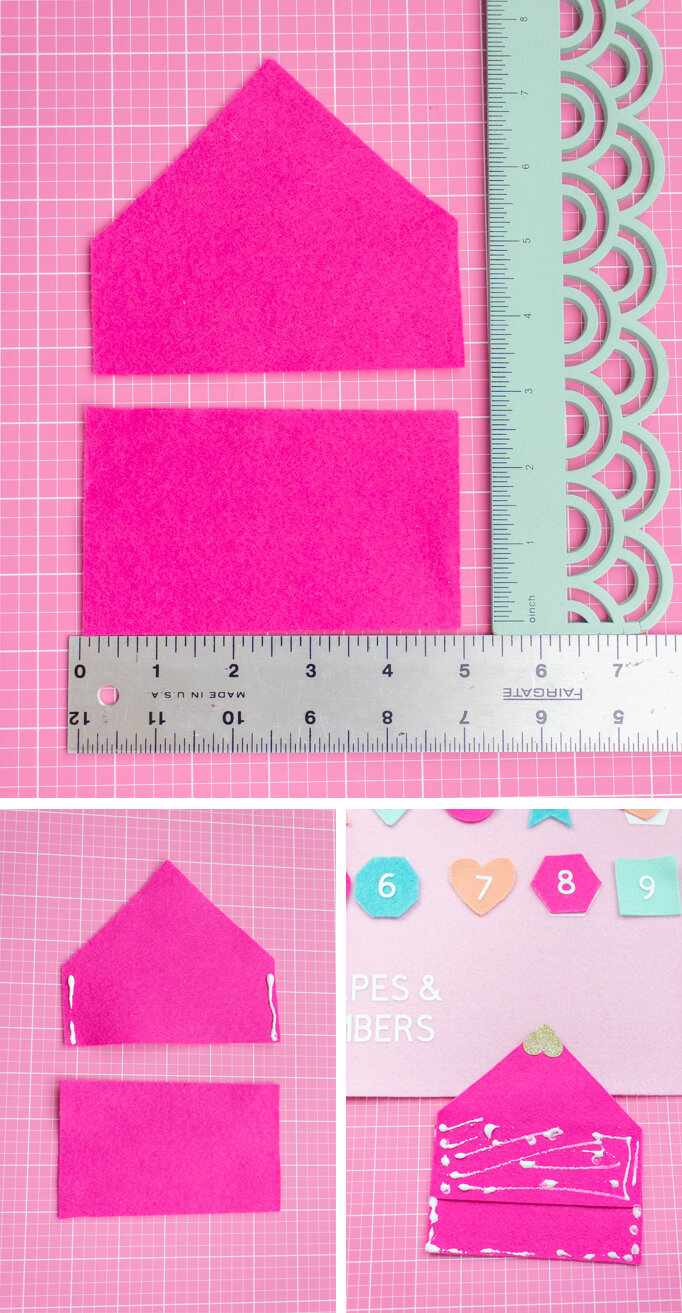
  1. Cut out your envelope pieces from felt. I used a rectangle that was 5 x 2.5 (aka, smaller rectangle) and then a second piece that was approx 5 x 7.5 (aka, the house side).

  2. Take your larger 5 x 7.5 felt rectangle. Fold the two top corners into the center to meet at a point and then cut at the folds. This will create your point at the top while still keeping it nicely centered. Hence, the nickname “the house side”!

  3. Take your “house side” of felt and put felt glue along the two side edges. Then, place your 5 x 2.5 smaller rectangle on top. See the pics for reference on how to make the envelope since it’s a bit funky!

  4. Turn your envelope over and put glue on your envelope as shown in the picture. Then, press it down on your felt mat and wait for it to dry.

  5. For the heart, I used my heart punch but you could just as easily cut one using the Cricut Joy with the Light Grip Mat.

  6. Glue your heart onto the tip of your envelope point. Then, add a piece of velcro to seal it.

Cricut-Shape-Mat-16.jpg

I’m happy to say that Hailey LOVED playing with this matching game! She hasn’t quite gotten the hang of matching the shapes and numbers, but she loves to play with the felt shapes and put them on top of the vinyl on the mat. She’s gone back to it every day, and has even put down her iPad to fiddle with this! It makes a momma so happy. 

Cricut-Shape-Mat-18.jpg
Cricut-Shape-Mat-19.jpg
Cricut-Shape-Mat-20.jpg

Although this project has a few steps, it’s really fun to make and quite simple. It keeps Hailey busy and it’s pretty to look at! And, it all tucks away nicely into the envelope to make clean-up a breeze. I leave this out on the coffee table to she can have easy access when she gets bored. I can’t wait to make more projects like this using my Cricut Joy!

Starting today through 4/25, Cricut is launching their Spring Cleaning Flash Sale, featuring 40% off select materials and accessories, and Explore Air 2 Machines at their lowest price ever of $179.99! In addition, snag a Maker Machine for $329 or a BrightPad for $49!

Explore Air 2 Machines at Their Lowest Price Ever - As Low as $179.99! Valid through 4/25 

Maker Machines Starting at $329! Valid through 4/25  

Save 40% off Select Materials! Valid through 4/25 

Save up to 75% off Materials & Accessories Clearance! Valid through 4/25


Cricut.com is offering Free Economy Shipping on orders $99+ with code SHIPAPR or APRSHIP, and Cricut Access Members receive free shipping on orders through 4/30. Head over to their website and load up your cart girlfriend- let’s get crafting!

DIY Varsity Letter Sweatshirt

The other day, I was sitting in the car in a mini mall parking lot, and suddenly had this great idea to create a varsity letter themed sweater. Maybe it’s because of all the back-to-school stuff or the fact that it’s fall, but suddenly I wanted nothing more than a cozy sweater with a cute fluffy letter on it. So, I bumped all the other blog posts I had out of the way so that I could show you guys this cute sweater that I made for myself! The best part is that it’s super affordable, so you can definitely make one for yourself! I was able to get everything I needed on Amazon so I didn’t even need to leave the house or go shopping at the mall for the right supplies. However, if you want to live out your back to school shopping days and go to the mall, don’t let me stop you. Shop til you drop honey!

Maybe it’s because of all the back-to-school stuff or the fact that it’s fall, but suddenly I want nothing more than a cozy sweater with a cute fluffy letter on it. This varsity sweater is really easy to make- so easy, it almost isn’t a DIY! Click f…

I feel silly calling this a DIY but technically it is. Lucky for you, it’s an easy one!

You will need:

Sweatshirt (here)
Iron-on letters (here)
Vanishing ink marker or chalk (here or here)
Iron (similar here)
Piece of cotton fabric

Maybe it’s because of all the back-to-school stuff or the fact that it’s fall, but suddenly I want nothing more than a cozy sweater with a cute fluffy letter on it. This varsity sweater is really easy to make- so easy, it almost isn’t a DIY! Click f…

Directions:

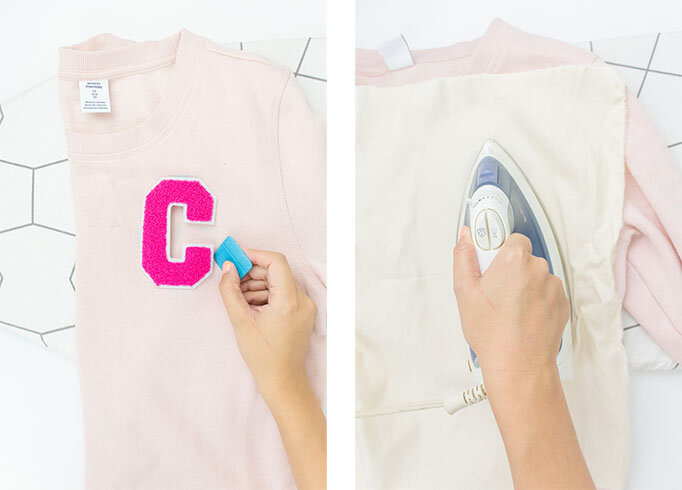
  1. Try on your sweatshirt and mark where you want your letter to go. I used fabric chalk, but you can also use vanishing ink markers or even regular chalk if that’s all you have.

  2. Place your letter on the sweater in the desired spot and place a piece of cotton fabric on top to prevent burn on the patch.

  3. Iron it on, making sure to focus on the edges so it doesn’t peel. My directions said to iron on high for 30 seconds, but follow what your directions say.

  4. Turn your sweatshirt inside out and iron underneath the patch for another 30 seconds.

Maybe it’s because of all the back-to-school stuff or the fact that it’s fall, but suddenly I want nothing more than a cozy sweater with a cute fluffy letter on it. This varsity sweater is really easy to make- so easy, it almost isn’t a DIY! Click f…

To style your new sweater, try it with a sporty skirt or a pair of jeans and booties. It’s perfect for giving your outfit a sporty touch. There’s nothing better in the fall than a cozy sweatshirt, especially if it’s slightly oversized and therefore super duper comfortable. 

Maybe it’s because of all the back-to-school stuff or the fact that it’s fall, but suddenly I want nothing more than a cozy sweater with a cute fluffy letter on it. This varsity sweater is really easy to make- so easy, it almost isn’t a DIY! Click f…

That’s all there is to it! Now you’ll have a cute and comfy sweater to tote around with you during the fall. It’s perfect for chilly nights or for wearing during fun activities like apple picking or football games! You could even match it to your team colors or school colors. I went with pink because, you know…. those are my team colors! Haha.

Maybe it’s because of all the back-to-school stuff or the fact that it’s fall, but suddenly I want nothing more than a cozy sweater with a cute fluffy letter on it. This varsity sweater is really easy to make- so easy, it almost isn’t a DIY! Click f…

So, what do you think? Will you be slapping one of these bad boys on this fall? How would you style your sweatshirt? Let me know in the comments below!

Just a Wee Bit Irish Free Printable Iron-On

Happy St. Patrick’s Day! As the queen of the last minute blog post (seriously… it’s March 17!) I decided to make the easiest St. Patrick’s Day craft out there. A free printable where all you need is iron-on paper and a onesie or t-shirt! I’ve had this idea for a month but I was just finally able to work on it this weekend. Since Hailey is just a wee bit Irish (12.5%, to be precise!) I thought it would be really fun to make her this onesie! And since I'm generous, I'm sharing the printable with you totally for free! Also… I feel really foolish for having to use iron-on paper for dark fabrics YET AGAIN. I totally didn’t learn my lesson from Halloween but I’m going to order a new set for white fabrics, stat! Also, can we talk about how tiny newborn Hailey was. I’m not crying, you’re crying.

Looking for an easy St. Patrick’s Day craft for your baby or toddler? How about a free St. Patrick’s Day printable?! Get your for free now! #stpatricksday #freeprintable #ironon

You will need:

White onesies (here)
Iron-on paper (here)
Iron
Printer (I have this one and love it!)
Free Printable

The printable is available in my resource library, which you can get totally FREE access to, just by signing up. What exactly do you get? Access to all my printables, including party planning guides, checklists, and my projects. By signing up, you'll have access to all projects- past, present and future! 

Looking for an easy St. Patrick’s Day craft for your baby or toddler? How about a free St. Patrick’s Day printable?! Get your for free now! #stpatricksday #freeprintable #ironon

Isn’t she sooo stinkin’ cute in this little outfit?! If you want to create this super easy onesie for your little baby, get the free printable and get crackin’!

I’ll also add for a second time… your printable won’t have this white border if you get the right iron-on paper! You want to use one for light-colored fabrics.

The printable is available in my resource library, which you can get totally FREE access to, just by signing up. What exactly do you get? Access to all my printables, including party planning guides, checklists, and my projects. By signing up, you'll have access to all projects- past, present and future! 

DIY Pennant Flag Puns

Everyone is super excited about the Super Bowl, and I’m like cool... an excuse to have a party and eat! I’ve never really been into sports (or good at them...) so I figured for Super Bowl, I’ll just do what I do best... crafting! Since I don’t even know who’s playing, I figured I’d keep it nice and generic with some colorful, silly pennant flags that you can use for pretty much any football game in the future. And since I’m ridiculous, they’re full of funny sayings. That’s right- you can make some PUN-nant flags for your home! (see what I did there?!)

Pennant Flag Puns 18.jpg

You will need:

Pennant Flag Puns 5.jpg

Felt (similar here)
Cricut (here)
White iron-on vinyl (here)
Printer (I have this one and love it!)
Pennant template (here)
Cricut Template (here)
Iron (here)
Felt Scraps
Brown acrylic paint (here)
Glue gun
Cricut supplies & fabric scissors (here and here)
Felt football stickers (similar here)

Directions

Pennant Flag Puns Collage.jpg
  1. Cut out your vinyl on the cricut and get it ready for ironing. To learn more about using Cricut iron-on vinyl (with full instructions!) check out this post.
  2. Using your template, cut your pennant flags out of felt. If you position them efficiently, you can get at least 2 flags out of 1 piece of felt. 
  3. Iron your quotes onto the pennant flags. Let cool fully before peeling. See this post for more info.
  4. Create your felt embellishments as per the instructions below.
  5. Glue your embellishments onto the pennant flag using a glue gun.

For the finger:

Pennant Flag Puns 13.jpg

Cut a hand and finger shape out of pink felt. If you’re not sure of the shape, use a photo from online and trace it as a template onto the felt. Add a perimeter with white paint, then paint little triangles below the perimeter for knuckles. Once your paint has dried, iron the #1 onto the foam finger, then glue onto your flag. 

For the cookie:

Pennant Flag Puns cookies.jpg

Cut a squiggly oval out of tan felt. Using brown paint, add small dots for chocolate chips. My paint was named Melted Chocolate- how perfect! Let dry, then glue onto the flag. 

For the beer cup:

Pennant Flag Puns beer.jpg

Cut the shapes out of felt- a cup with handle, an oval with a flat top for the beer, a smaller oval with a flat top for the accent color, and white foam. I also cut an additional cup handle for more depth, which was basically a C-shape. Fold the cup in half, then cut the middle out of the handle. Trim as needed. Glue the felt pieces together and then glue your cup onto your flag. 

Pennant Flag Puns 14.jpg
Pennant Flag Puns 17.jpg
Pennant Flag Puns 16.jpg
Pennant Flag Puns 15.jpg

So what do you do with these now? Add a ribbon and hang them up! Or, add a stick and let your pun-nant flag fly! Or, uh... wave? What great football puns did I miss? Let me know in the comments below!

DIY Brightest Crayon Costume

Back in high school, my sister, my friend and me had matching screen names on AOL Instant Messenger. Remember AIM? RIP.... Anyway, we used to always get BFF necklaces and stuff, which always came with 3 colors- blue, pink and purple. We all had our colors that we usually wore, so we matched them on our screen names. Unfortunately, PURPLECRAYONS182 was too long, so I had to switch it up. I was going through a punk rock phase (insert laughing emoji here) so I went with black crayons. After that, we were known in our high school as The Crayons by pretty much everyone. If someone didn't know who we were they would say "she's one of the crayons" and then people would know. I realize this makes us sound popular or something, but I guarantee you, we were not. People actually hated us, for no good reason, but that's a story for another day....

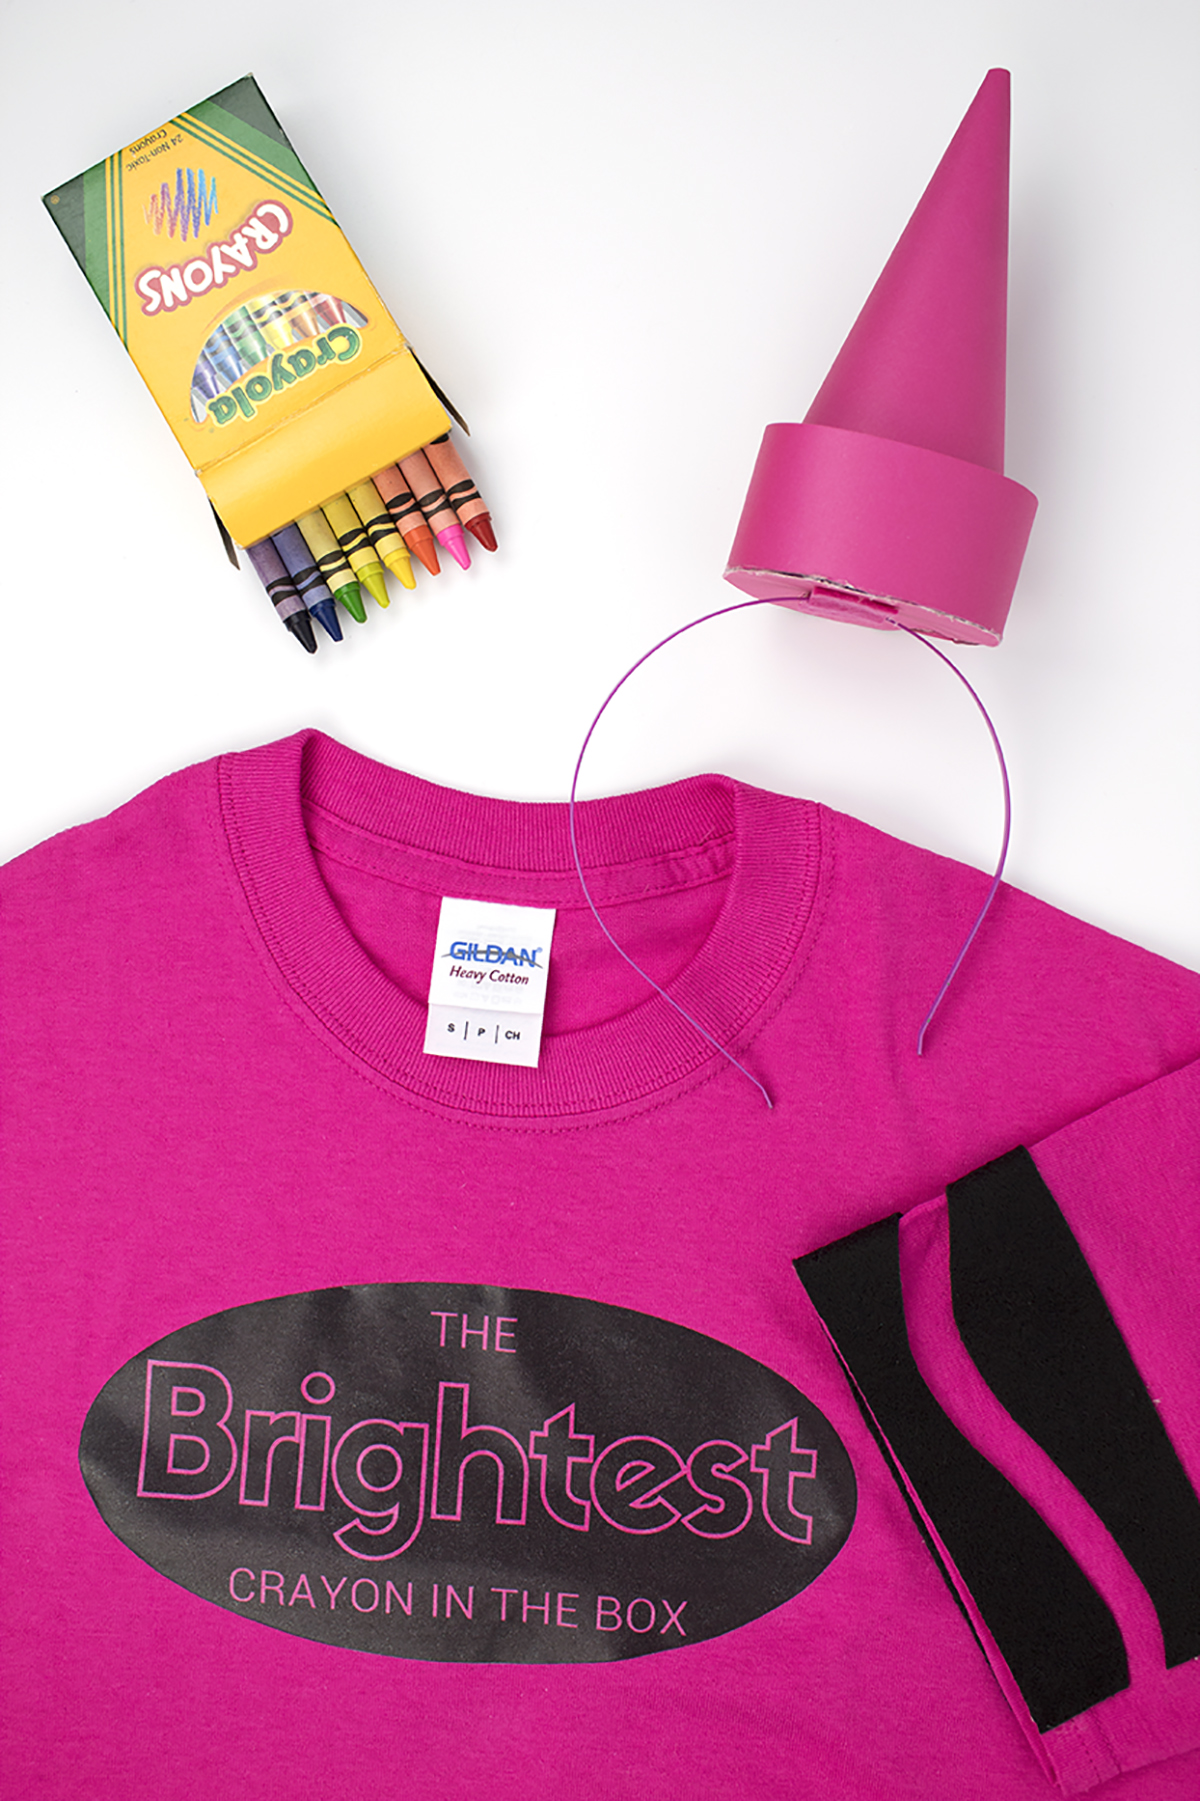
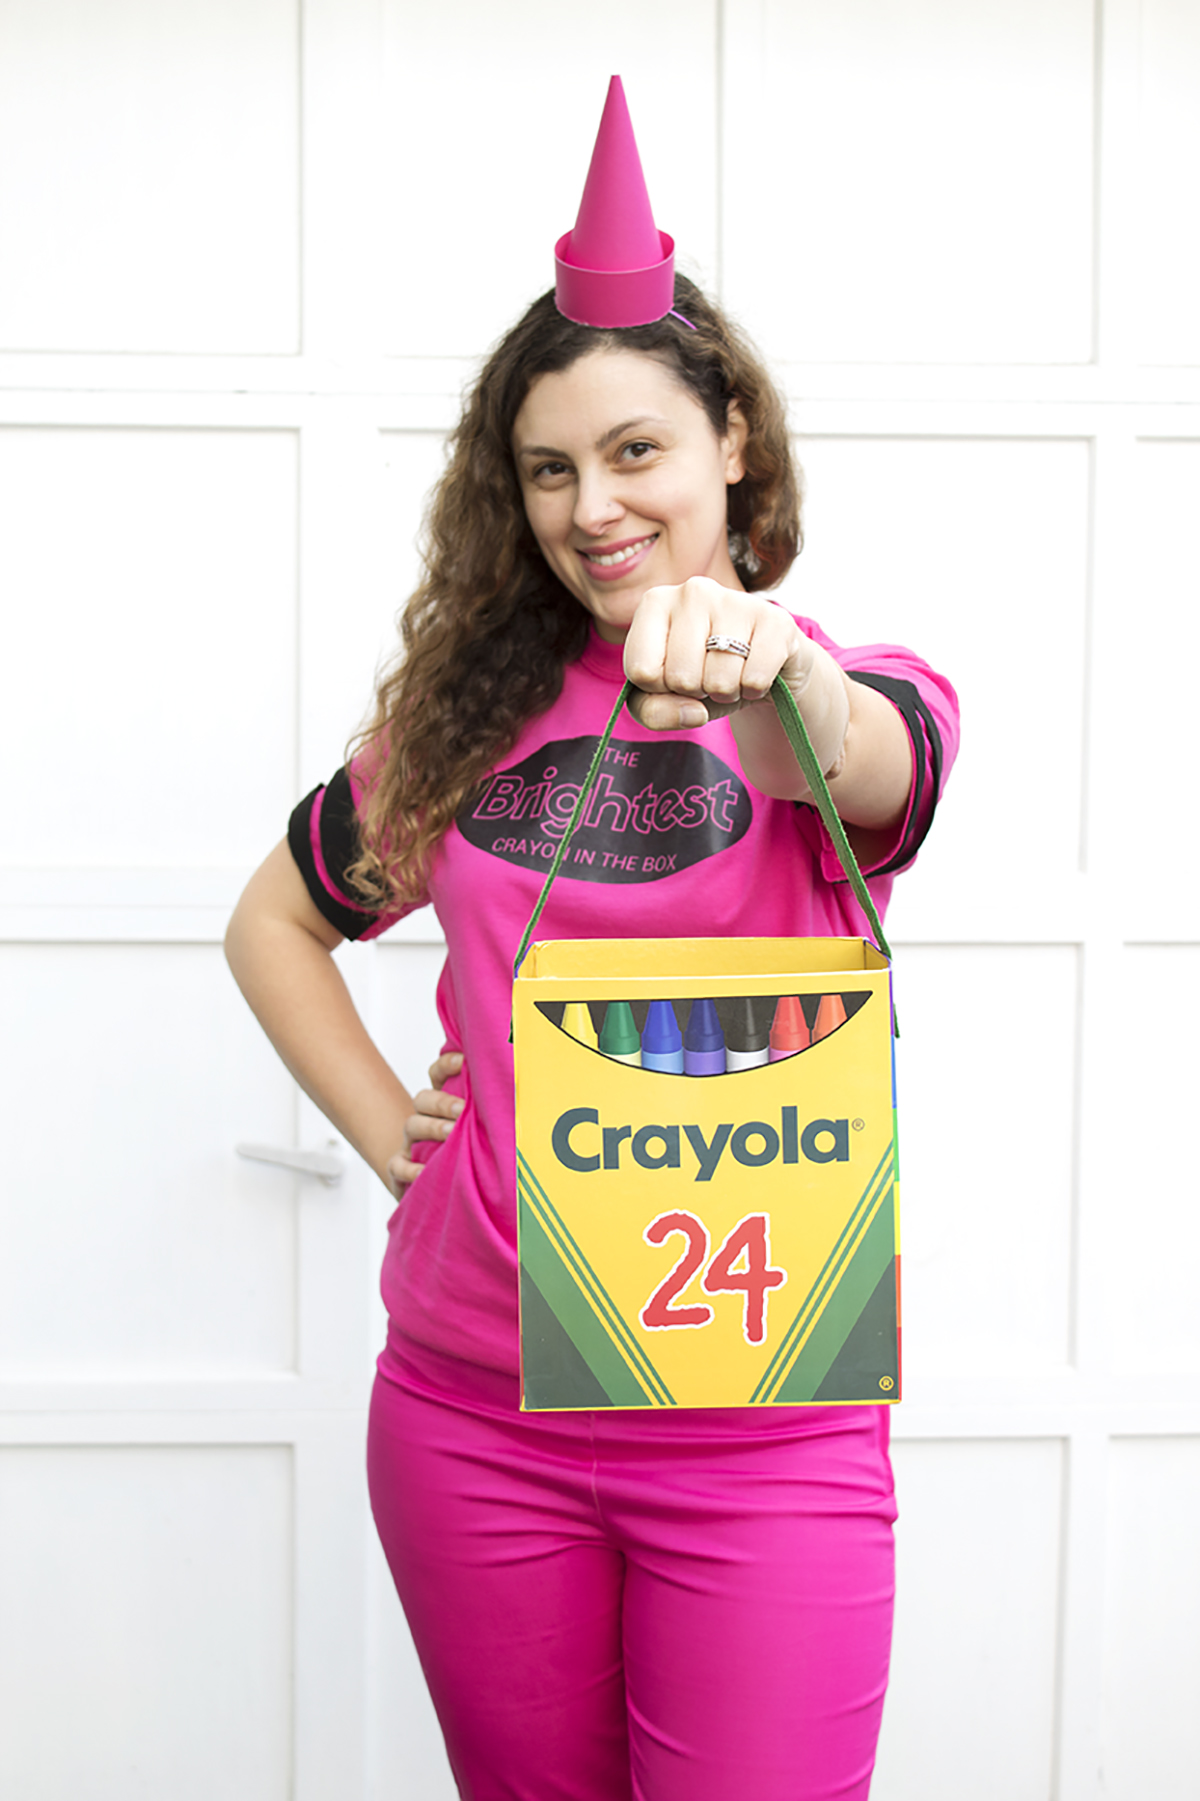
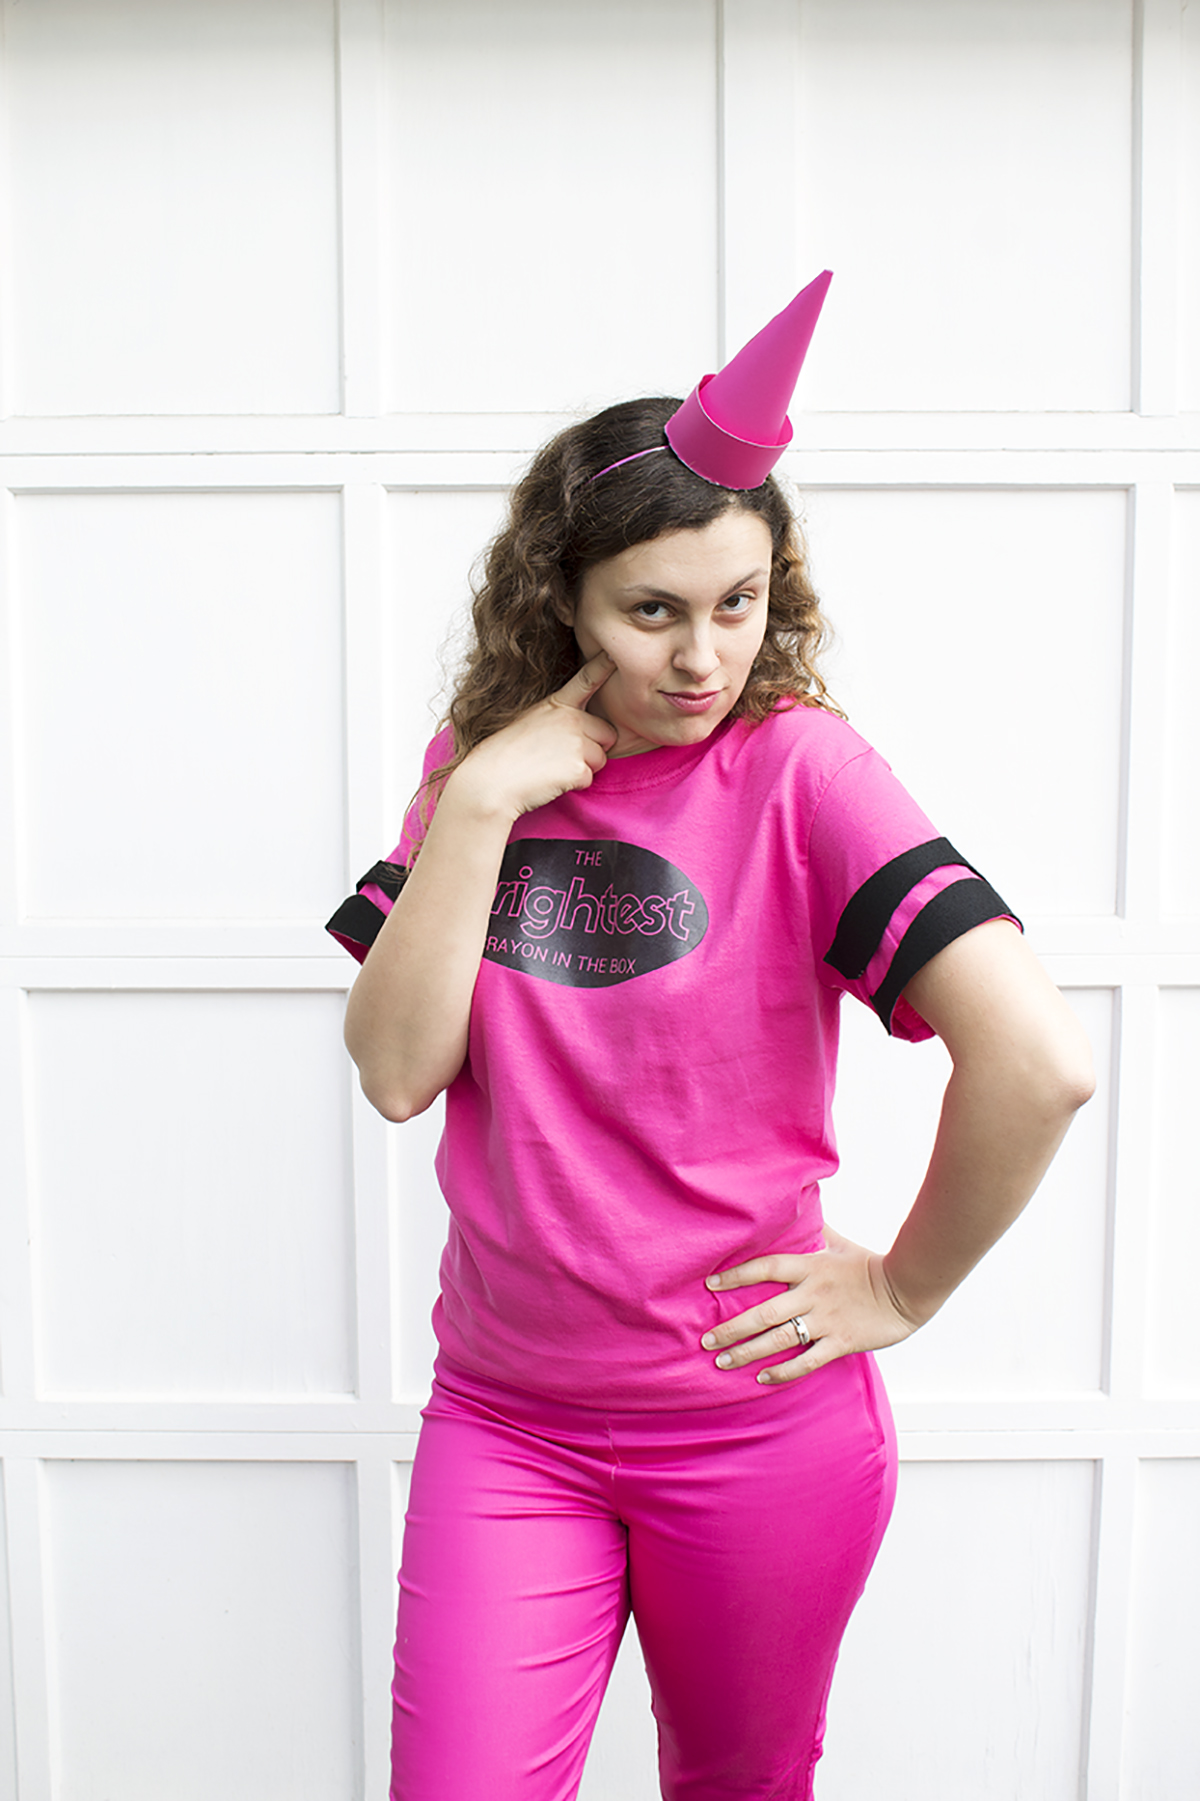
To commemorate my time as a crayon in high school, I knew I had to make a crayon costume for the blog. And, since I was a black crayon in high school, I knew I now had to change my look and be the BRIGHTEST crayon in the box. Because let's face it, I'm usually wearing the brightest colors of everyone I know, a la Kimmy Schmidt. This is sadly my last T-shirt costume of the year, but I'm so excited to show it to you! Plus, unlike most costumes, this is not "one size fits most". I've got the printable in a whole BUNCH of sizes, so you can make one for each member of the family!

Why be an ordinary crayon when you can be the BRIGHTEST crayon in the box?! Check out this DIY crayon costume project, and download the free printable so that you can be the brightest crayon too! Click for the full DIY. #crayoncostume #lastminutecos…
Why be an ordinary crayon when you can be the BRIGHTEST crayon in the box?! Check out this DIY costume project, and download the free printable so that you can be the brightest crayon too! Click for the full DIY. #crayoncostume #lastminutecostume #g…

You will need:

Why be an ordinary crayon when you can be the BRIGHTEST crayon in the box?! Check out this DIY costume project, and download the free printable so that you can be the brightest crayon too! Click for the full DIY.

For the outfit:

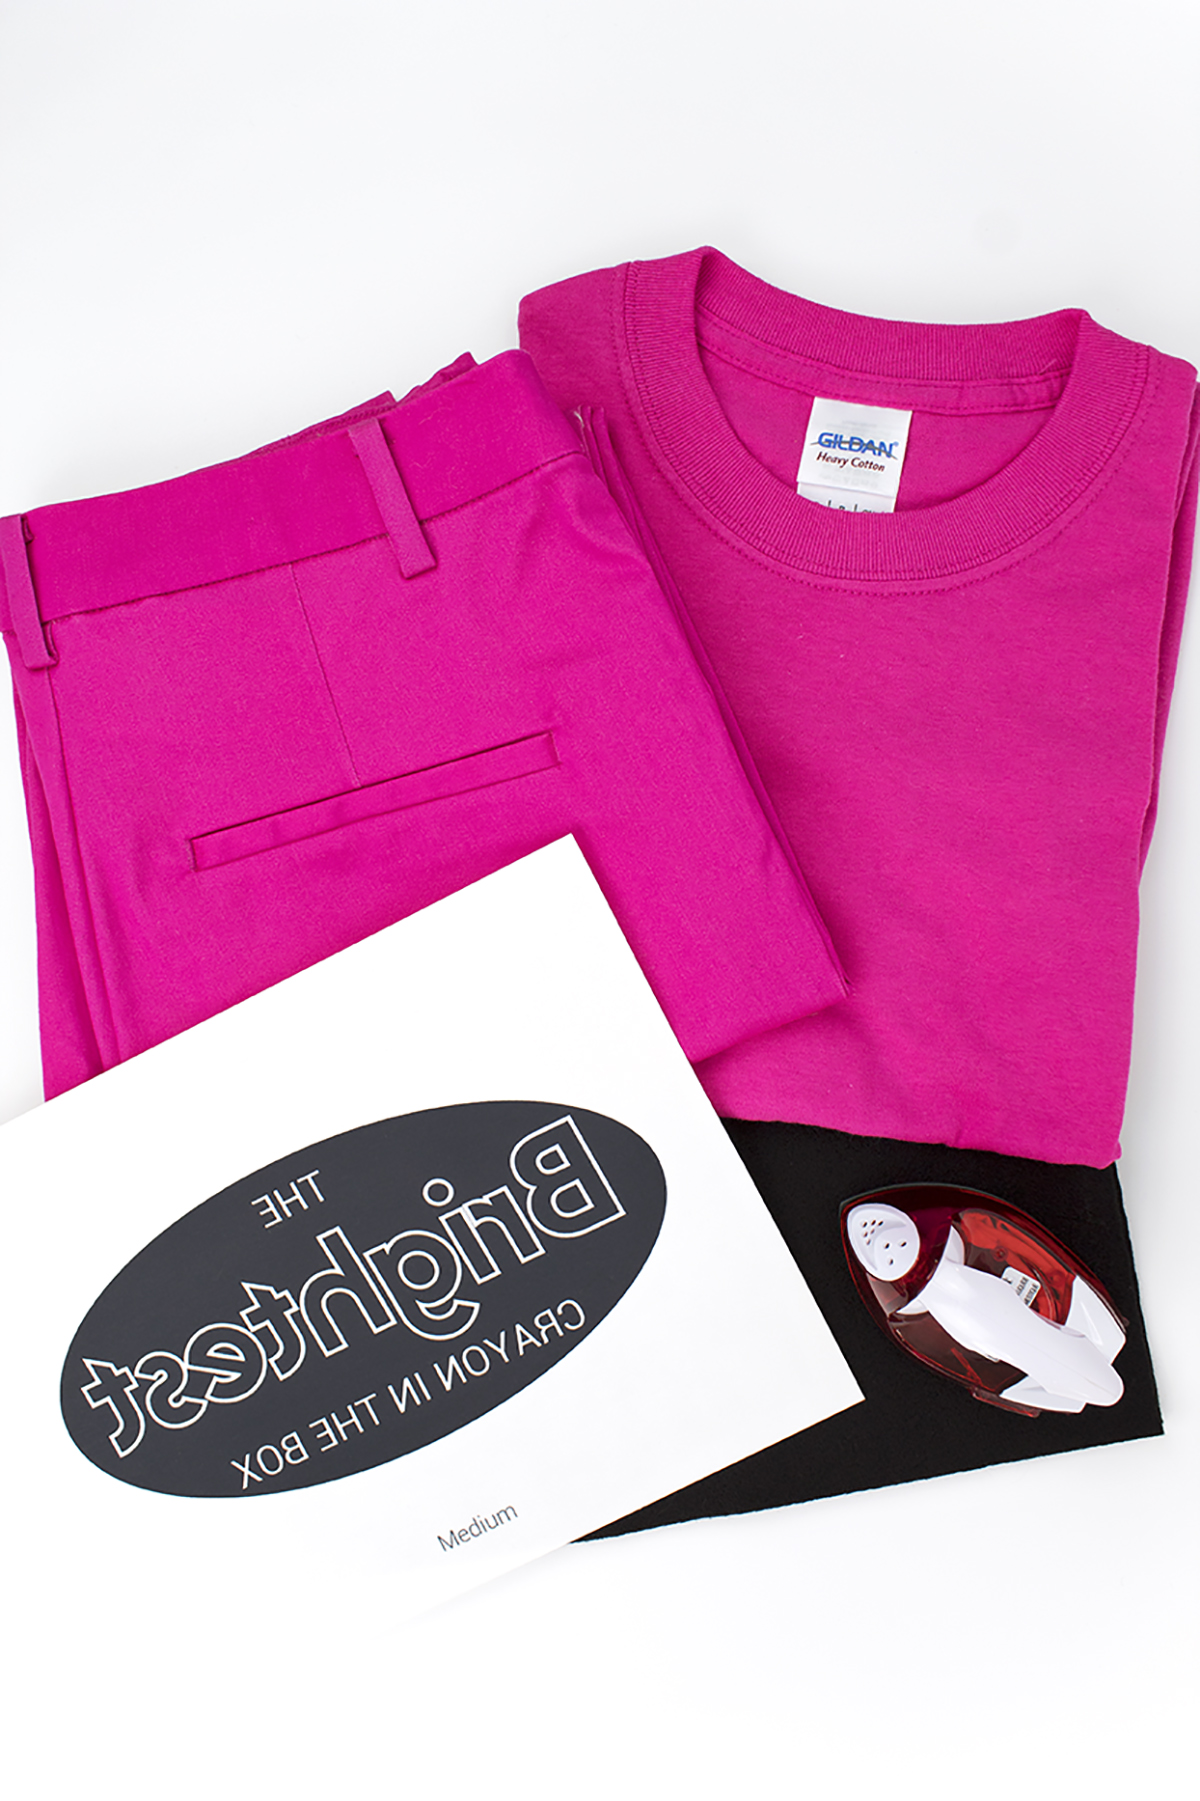
Cotton t-shirt (Gildan recommended)
Matching pants (mine are from H&M)
Iron-on transfer paper (here)
Black felt (1 sheet)
Chalk (here)
Printable (FREE! See below for more info)
Printer (I have this one and love it!)
Needle & thread
Iron
Glue gun
Scissors (here)

For the hat:

Matching cardstock (mine was double sided pink & light pink)
Glue gun
Pencil
Ruler
Scissors (here)
Large bowl (optional)

The printable is available in my resource library, which you can get totally FREE access to, just by signing up. What exactly do you get? Access to all my printables, including party planning guides, checklists, and my projects. By signing up, you'll have access to all projects- past, present and future! 


For the Shirt & Pants:

Why be an ordinary crayon when you can be the BRIGHTEST crayon in the box?! Check out this DIY costume project, and download the free printable so that you can be the brightest crayon too! Click for the full DIY.
  1. It's recommended to prewash your fabric. Run a lint roller over the part where the logo will go. I learned from last time any stray hairs or lint will get permanently embedded under your iron-on transfer.

  2. Print out your iron on transfer in the appropriate size (it comes in 5 sizes!) and cut it out as close to the edge as you can. This iron-on paper is intended for light fabrics, but I wanted one that was clear so that the shirt color would peek through on the font.

  3. Plan out where on your shirt you want to place the logo. Following the instructions, iron it on and let fully cool before peeling.

  4. Take your felt and fold in half the long way, then half again the long way. If your shirt is on the larger side or it's for a man, it might work better to fold it in thirds instead.

  5. With chalk, draw a squiggle pattern & cut it out.

  6. Using your glue gun, secure your felt onto your shirt. I advise putting the seam of the felt (where the 2 ends meet) along the seam of your shirt sleeve. If it's a little short, it'll be covered under your armpit.

  7. For the pants, you can also glue it on but I stitched mine with a needle and thread. I used large, simple stitches so that I can remove the felt and wear the pants again :)


For the Hat

Why be an ordinary crayon when you can be the BRIGHTEST crayon in the box?! Check out this DIY costume project, and download the free printable so that you can be the brightest crayon too! Click for the full DIY.
  1. Create a template for your hat onto white paper. As a hack, you can use a large bowl or round object and trace it onto the white paper, but I found that drawing a sweeping line did the trick for me.

  2. Trace your template onto the back side of your colored paper. Mine was double sided pink and light pink, which was helpful for the crayon base.

  3. Trace a small round object to be the bottom of your hat. I used the top from my fruit container, which was a great size. You want an item that is slightly larger than your cone.

  4. Draw a long rectangle, about 2-3 inches wide for your crayon hat base. I made mine as wide as the space that was left after drawing my cone.

  5. Cut out your parts, then cut the small tip off your flattened cone. You want it to have a flat pointed edge, like a crayon.

  6. Roll your hat into a cone and glue it shut. Trim off any excess paper that prevents it from being flat at the bottom.

  7. Glue the cone onto your base, and trim off the excess.

  8. Glue your rectangle ends together to make a "bracelet", then slip it onto your hat. Glue in place.

  9. Add a clip or headband to secure the hat onto your head. Be sure to add a piece of felt to hold it together, since the paper won't glue onto the headband well. (Check out the crown in this DIY for more info)

Why be an ordinary crayon when you can be the BRIGHTEST crayon in the box?! Check out this DIY costume project, and download the free printable so that you can be the brightest crayon too! Click for the full DIY. #crayoncostume #lastminutecostume #g…
Why be an ordinary crayon when you can be the BRIGHTEST crayon in the box?! Check out this DIY costume project, and download the free printable so that you can be the brightest crayon too! Click for the full DIY.  #crayoncostume #lastminutecostume #…

T-shirt: $4
Headband/Hair Clip: $1
Felt: $1
Caardstock Paper: $2
Iron-ons: $9

Total cost: $17

I'd say that's a pretty good cost for a Halloween costume! If you already have a pair of colored jeans, I recommend starting there so that you can save some moolah overall. I actually had these pants already, and the shirt was the exact perfect color to match! I borrowed the crayon box bucket from my neighbor, who was super sweet and let me take some pics in front of her nice white garage door. She got it at a Halloween store, but I bet you could even make a similar one with a picture from online! Overall I'm pretty darn happy with this crayon costume, and I hope you guys are too!